Tag Archives: buttermilk

Got Almost-Expired Buttermilk? Make Cranberry-Orange Scones

27 Mar

The leftover buttermilk from my spiced sweet potato muffins has been calling out to me each time I open the fridge.  Visions of scones and buttermilk pancakes have been dancing in my head.

Traditional buttermilk is the liquid left behind after churning butter out of cream.  Commercial buttermilk, on the other hand, is just milk with added bacteria—similar to yogurt but made with slightly different bacterial strains.  When I explained this to E, he asked “Why do they call it buttermilk? They should call it yogurtmilk.”  (Side note: at the time, he was slightly bitter after unknowingly adding buttermilk to his freshly brewed cup of coffee. The grimace on his face hung around for days).

If you don’t have buttermilk when your recipe calls for it, thinning plain yogurt with a bit of water or milk makes a great substitute.  Alternatively, you can add 1 tsp of vinegar to 1 cup of milk and let sit for 10 minutes.  Words of wisdom: the latter is better suited for muffins and loaves, NOT scones.  It doesn’t give you the same thick consistency needed to hold a dough together. I learned this the hard way a couple of years ago.

Last night I finally stole some time to bake up the scones that I’ve been dreaming of for the past two weeks.  I was skeptical about substituting whole wheat flour in place of all-purpose but I just HAD to do it.  The result was a heartier scone than you might be used to, but still crumbly and tender.  I also got away with reducing the sugar a touch.  It was not missed.  These scones are a nice alternative to muffins and the perfect accompaniment to tea.  Or a mid-week glass of wine.

SconeFromOven

DSC_0329

Cranberry-Orange Scones
(from The Looneyspoons Collection)

1 ½ cups all purpose whole wheat flour
½ cup oat bran
½ cup sweetened dried cranberries, chopped
1/3 ¼ cup packed brown sugar
2 tsp baking powder
1 tsp baking soda
½ tsp salt
1 cup buttermilk
2 tbsp butter, melted
2 tsp grated orange zest
½ tsp vanilla
1 egg

  1. Preheat oven to 400 degrees Fahrenheit. Spray a large baking sheet with cooking spray (or line with parchment paper) and set aside.
  2. In a large bowl, combine flour, oat bran, cranberries, brown sugar, baking powder, baking soda, and salt.  Set aside.
  3. In a medium bowl, whisk together buttermilk, butter, orange zest, and vanilla. Add wet ingredients to dry ingredients.  Stir until a soft dough is formed. Add a bit more flour if dough is too sticky.  Turn dough onto a lightly floured surface. Divide into 2 pieces.  Shape each piece into a ball. Place balls on baking sheet and pat dough to ¾-inch-thick circles, about 6 inches in diameter. Using a sharp knife, cut each circle into 6 wedges, but do not separate them.
  4. To make glaze, lightly beat egg with 1 tbsp of water in a small bowl. Brush glaze lightly over top of dough (you will use less than half of the glaze).
  5. Bake for 15 – 17 minutes, until scones are puffed up and golden.  Cool slightly. Pull scones apart and serve warm.

Makes 12 scones.  Per scone (Lisa’s tweaked recipe):  120 kcal, 3 g fat (1.5 g saturated), 3 g protein, 20 g CHO, 2.2 g fibre, 311 mg sodium.

Whole Wheat Banana Bread with Millet

21 Apr

In my attempt to cook one new food a week, I recently tackled a grain that’s rarely consumed in North America:  millet.  Millet is a small, seed-like grain that can be eaten raw or cooked into a sweet or savoury porridge.  I was inspired by a friend of mine who grew up eating millet much like I would eat oatmeal.

In its raw form, millet can be added to breads for a unique crunch.  It is also one of the major ingredients in birdseed.  From a nutritional standpoint, millet is very similar to wheat– a good source of fibre and rich in B vitamins.  As a bonus, millet is a great wheat-alternative for individuals with celiac disease as it’s gluten free.

Now… how to cook this teensy little grain?  I came up with my own directions from a few different sources and the final product was acceptable, but not great.  My mistake was rinsing and toasting the grains.  According to other sources, you can omit the rinse if you plan to toast.  Next time I think I will try these instructions… the author looks like she knows her millet!

Cooked Millet, eaten just like rice

My second attempt was to incorporate the raw grains into my favourite banana bread recipe.  The millet added a fun texture that both E and I really liked.  If you’re not sold, make the banana bread without the millet– you won’t be disappointed!

Whole Wheat Banana Bread with Millet


Whole Wheat Banana Bread with Millet

This is my favourite healthy banana bread recipe with the addition of raw millet.  I used half a cup of millet but I think one quarter of a cup might provide a slightly better texture.  Omit the millet if you’re not feeling adventurous!

1-2/3 cups whole wheat flour
1 tsp baking soda
1/2 tsp cinnamon
1/4 tsp salt
1 egg
1/2 cup packed brown sugar
1-1/4 cups mashed overripe bananas
1/3 cup buttermilk or sour milk*
3 tbsp canola oil
1 tsp vanilla extract
1/4 to 1/2 cup millet  (optional)

*to sour milk, pour 1 tsp vinegar into measuring cup; add milk to make 1/3 cup.  Let stand 5 minutes.

  1. Preheat the oven to 350 degrees Fahrenheit.  Grease an 8.5 x 4.5″ non-stick loaf pan.
  2. In a small bowl, stir together flour, baking soda, cinnamon, and salt.  Set aside.
  3. In a large bowl, combine egg, sugar, bananas, buttermilk, oil, and vanilla.  Whisk well until thoroughly blended.
  4. Add flour mixture to banana mixture and stir just until combined.  Stir in millet if using.
  5. Bake for 55 minutes or until tested inserted in centre comes out clean.  Let cool in pan for 5 minutes, then turn out onto cooling rack to cool completely.

Makes 1 loaf, about 16 slices.  Per slice (with millet): 145 kcal, 3.5 g fat, 2.5 g fibre

The Greatest Thing Since Sliced Bread

2 Sep

I had never heard of soda bread until we made it in my food science lab a couple of years ago.  Up until that day, I was only familiar with your classic sandwich breads (made with yeast) and the dense, sweet breads that my mom used to bake (banana bread with chocolate chips was my favourite!).  Little did I know that you could loosely combine these two types of breads and produce a sandwich-worthy loaf with little to no effort.

Soda bread is similar to many sweet breads (banana bread, loaves, muffins) in that the primary leavening agent used is baking soda.  There is no yeast involved, so you don’t have to put in the extra work of kneading and you don’t need to allow any extra time for rising.  In fact, the baking soda becomes active the minute it is in contact with something wet (in this case, buttermilk), so minimal handling is ideal as you want to get the loaf into the oven ASAP.

Before

After


Call me a nerd, but the joy of seeing a nondescript blob of dough transformed into a beautifully risen loaf of bread is what I consider to be one of life’s many greatest pleasures.  Yeast breads are a bit more rewarding given how much work goes into them, but this one gives you that same sense of accomplishment with very little effort.  The final product is more dense than your typical yeast bread but it still works well if you’re using it for sandwiches.  I like to eat soda bread as a side– it is the perfect accompaniment to a hearty soup or stew.


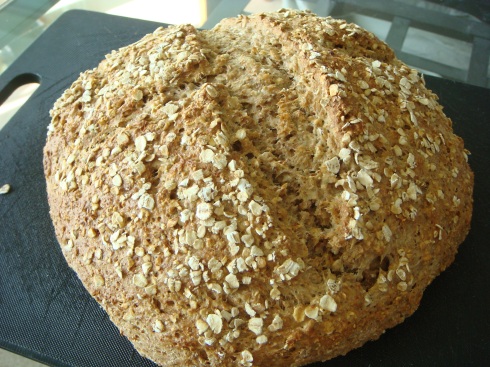
Freshly Baked Whole Grain Irish Soda Bread


Whole Grain Irish Soda Bread
(from the Foods and Nutrition 2232 Recipe Manual)

I’ve been tweaking this recipe to lower the amount of all-purpose flour used.  Most recently, I used only 1 cup of all-purpose flour and increased the whole wheat flour to 2 and 2/3 cups.  The bread tasted identical to the original recipe, the only change was that I needed to add a touch more buttermilk so that the dough was moist enough to work with.  Feel free to play with the recipe as you go– it’s virtually fool-proof!

1-2/3 cup all-purpose flour (I used 1 cup)
1 tablespoon sugar
1-1/2 teaspoons baking soda
1/2 teaspoons salt
2 cups whole wheat flour (I used 2-2/3 cup)
2/3 cup old-fashioned rolled oats
1/4 cup wheat bran
2 cups buttermilk

Topping:
1 tablespoon buttermilk
1 tablespoon old-fashioned rolled oats

  1. Preheat oven to 375 degrees Fahrenheit.  Line a baking sheet with parchment paper.
  2. In a large bowl, sift together all-purpose flour, sugar, baking soda, and salt; stir in whole wheat flour, 2/3 cup of oats, and bran.  Make a well in the centre; add buttermilk, stir until a soft dough forms.
  3. Turn out dough onto lightly floured surface (or onto a large square or wax paper).  Knead 5 or 6 times until smooth.  Shape dough into a ball; bat into a 8″ (20 cm) round.  Place on prepared baking sheet.  With a sharp knife dipped in flour (a serrated knife works best), cut a large 1/2″ (1 cm) deep cross on top of the loaf.
  4. Brush loaf with remaining 1 tbsp buttermilk; sprinkle with 1 tbsp oats.  Bake for 50 to 60 minutes or until well risen and golden.  Loaf will sound hollow when tapped on base.  Immediately wrap in a clean, dry tea towel.  Set aside to cool (this prevents the crust from becoming too hard).

The only downside to this bread is that it does not last very long on the counter and tastes best if eaten within a day or two.  After a few days, it becomes crumbly and dry.  Since this makes a large loaf (~28 small slices or 14 large slices), I like to slice the loaf and freeze it the day of or the day after I make it.  To serve, microwave each slice for 10 to 20 seconds in the microwave and top with a dab of butter or margarine.

Makes 14 large slices.  Per slice: 145 kcal, 1 g fat, 3.7 g fibre, 255 mg sodium

Wild Black Raspberries… worth every bite?

12 Jul

E and I went for our annual 20 km hike around Lake Fanshawe on the weekend.  We perfectly timed our trek with black raspberry season after being just a bit too early last year.  Tupperware container in hand, I was ready to forage… but was I ready for the mosquitoes?

We managed to bring home roughly 2 cups of wild black raspberries… and just over 3 dozen mosquito bites between the two of us.  I’m itching as we speak!  Unsure of what to do with the berries, I did some searching.  A lot of blood, sweat, and near tears went into these berries and I wanted to find a great recipe.  Originally I decided on healthy raspberry cobbler bars, but then changed my mind after stumbling across a recipe for a mango berry cobbler.  I had 2 mangos lying around, along with some buttermilk and half a lemon that needed to be used up quickly.  This was the perfect way to kill several birds with one stone.

Freshly Foraged Wild Black Raspberries

The cobbler smelled delicious coming out of the oven, but… the taste was slightly disappointing.  Being a McCormick’s recipe, it called for what seemed like a LOT of cinnamon and ginger.  I’m a cinnamon-lover but even I thought it was excessive (of course, this is quite strategic from McCormick’s perspective, being a spice company and all).  Instead of trusting my gut, I followed the recipe as written and the result was an overly spiced, slightly bitter cobbler.   On the bright side, a dollop of vanilla yogurt served alongside the cobbler muted some of the spice and made for a much more enjoyable dessert.

Black Raspberry-Mango Cobbler

Below I’ve posted some changes to the original recipe that I will try next time. This cobbler has a lot of potential, so I’ll definitely be making it again (perhaps when peaches are in season… mmmm).

Black Raspberry-Mango Cobbler
(adapted from McCormick’s Mango-Blueberry Cobbler)

Filling:
3 cups mango, peeled and sliced (or peaches)
2 cups black raspberries (or red raspberries, or blueberries)
1 tbsp lemon juice
1/3 1/4 cup sugar
2 tsp cornstarch
2 tsp cinnamon
1/2 tsp ground ginger

Biscuit Topping:
1/2 cup whole wheat pastry flour
4 3 tbsp sugar
1/2 tsp baking powder
1/2 tsp cinnamon
1/2 1/4 tsp ground ginger
1/4 tsp baking soda
pinch of salt
1/3 cup buttermilk

  1. Preheat oven to 350 degrees Fahrenheit.  Spray an 8″ x 8″ baking dish with non-stick spray.
  2. For the filling, combine mango, berries, and lemon juice in a large bowl.  In a small bowl, mix 1/4 cup sugar and cornstarch. Sprinkle over fruit and toss to coat well.  Spoon into prepared dish.
  3. For the biscuit topping, combine flour, sugar, baking powder, cinnamon, ginger, and baking soda in a medium bowl.  Mix with a fork.  Add buttermilk and mix well.
  4. Drop biscuit topping by rounded tablespoonfuls into 6 portions onto fruit mixture.
  5. Bake for 35 to 40 minutes, until fruit is bubbling and topping is browned.  Serve warm.

Makes 6 servings (3/4 cup each).  Per serving: 185 kcal, 1 g fat, 5.8 g fibre, 120 mg sodium