Tag Archives: egg

The 411 on Eggs & Cholesterol (feat. Huevos Rancheros)

21 Feb

Egg lovers, rejoice! The US government released their latest edition of the Dietary Guidelines for Americans last month and one of the most controversial changes was their decision to remove limits on dietary cholesterol. Historically people have been advised to limit their cholesterol intake to less than 300 milligrams per day in order to reduce the risk for heart disease. Since one large egg contains 186 milligrams of cholesterol, eating anything more than one egg per day was frowned upon.

DSC_0953 (2)

Why the new recommendation, you ask? Over the past several years, evidence has emerged to suggest that cholesterol in our diet is not the main dietary cause of high blood cholesterol levels. Saturated and trans fats—most commonly found in fatty meat, full-fat dairy, and packaged and processed foods made with hydrogenated oils—have more of an impact on blood cholesterol levels, and the US government continues to recommend that we limit our intake of saturated fat to less than 10% of our total calories. For the average person, this amounts to no more than 20 to 30 grams of saturated fat per day.

Before you go hog-wild on eggs, there are a few other things that you should know. Studies have shown that eating up to 1 egg per day is not associated with increased heart disease or stroke in the general population; however, people with diabetes have an increased risk for heart disease if they eat 1 egg (or more) per day.  In people without diabetes, one whole egg per day—or 7 per week—is probably not going to do you any harm. Eggs are a good source of protein, vitamin B12, vitamin D, riboflavin, and folate—and most of the egg’s nutrition is in the yolk. If you already have high cholesterol, heart disease or diabetes, be cautious about the number of egg yolks you eat and take into account other sources of saturated fat in your diet. Egg whites can be incorporated into scrambled eggs, omelettes, and quiches in place of some of the whole eggs for similar flavour and texture with much less saturated fat and cholesterol.

With all of this talk of eggs, I’ve had a major craving for my favourite brunch dish: huevos rancheros. It’s hard to beat Mexican flavours for breakfast, plus it happens to be a perfect gluten-free brunch dish when family or friends with celiac disease come to visit. I found this recipe following a search for beanless huevos rancheros, since legumes and my tummy don’t always get along. The simple yet spectacular chipotle salsa is top notch with its mild heat and smokiness, but the true star of the dish is the corn tortillas. We have the luxury of living 10 minutes away from a tortilla factory, but you can usually find them at specialty food shops or in the refrigerated or frozen section of your grocery store.

¡Buen Provecho! (the Spanish version of “Bon Appetit”)

DSC_0966 (2)

DSC_0957 (2)

Huevos Rancheros
(adapted from Epicurious.com)

6 teaspoons vegetable oil, divided
8 (5-inch) corn tortillas
1 28-ounce can whole tomatoes in juice (preferably no-salt-added)
1/2 cup chopped white onion
1/4 cup chopped fresh cilantro, plus additional for garnish
1 tablespoon chopped canned chipotle chiles in adobo
2 garlic cloves, coarsely chopped
1/2 teaspoon salt (I used 1/4 tsp which tasted good, but E thought a bit more salt would be best)
8 large eggs
1 avocado, sliced

  1. Preheat oven to 200°F. For the sauce, purée tomatoes with their juice, onion, cilantro, chipotle, garlic, and salt in a blender until very smooth. Set aside.
  2. To warm the tortillas, heat 1 teaspoon oil in a 10-inch heavy skillet over moderate heat until hot but not smoking. Stack 2 tortillas in skillet and cook 30 seconds, then flip stack over with tongs and cook 30 seconds more. While second tortilla cooks on bottom, turn top tortilla over with tongs, keeping tortillas stacked. Flip stack again and cook in same manner, turning over top tortilla and flipping stack again so that both tortillas are softened and both sides puff slightly, then deflate (do not let them become browned or crisp). Wrap tortillas loosely in foil and keep warm in oven. Cook remaining tortillas in the same manner, adding 1 teaspoon of oil to the skillet for each batch.
  3. Once tortillas have been warmed (and are resting in the oven), add tomato purée carefully to the hot skillet (it may splatter) and simmer, stirring occasionally, until salsa is slightly thickened, about 10 minutes.
  4. In a separate pan, heat 1 teaspoon oil in a 12-inch heavy non-stick skillet over moderately high heat until hot but not smoking, then crack 4 eggs into skillet and cook 3 to 4 minutes for runny yolks, or to desired doneness. Transfer to a plate and keep warm, covered, then cook remaining 4 eggs in remaining teaspoon of oil in same manner. Season eggs with salt and pepper.
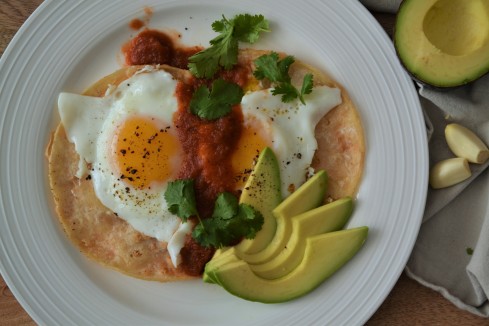
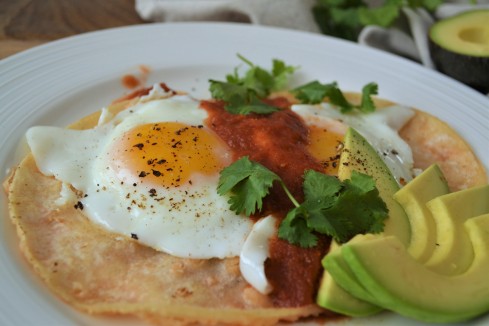
  5. To serve, spoon 1/4 cup salsa onto each plate and top with 2 tortillas, slightly overlapping them. Transfer 2 eggs to tortillas on each plate and top with some of remaining salsa. Divide avocado between 4 plates. Sprinkle with cilantro.

Makes 4 servings. Per serving: 405 kcal, 24 g fat (4.4 g saturated), 33 g carbohydrate, 6.3 g fibre, 17 g protein, 495 mg sodium.


Naturally Dyed Easter Eggs

29 Mar

This Easter, I challenge you to channel your inner five-year-old and let your creative juices flow.  No, I’m not referring to an elaborate Easter egg hunt (although that could be fun, too).  I’m encouraging you to dye your very own Easter eggs!

Last Easter, I decided to re-live my childhood by making dyed eggs for the first time in two decades.  To avoid looking completely wacko (how many twenty-somethings dye Easter eggs solo?), I convinced my sister and our friend Allie to join.  This made for an afternoon of bizarre drawings and lots of laughter.  My main motivation for dyeing eggs was a recipe I came across for vegetable-based dyes, which seemed too cool not to try.

DSC05878

DSC05867

The colour possibilities were pink (beets), blue (red cabbage), yellow (turmeric), orange (red onions), and brown (yellow onions).  Brown Easter eggs?  No thanks.  We stuck to pink, yellow, and blue but unfortunately the blue wasn’t very potent so it was a lost cause.  The natural dyes weren’t as strong as their synthetic counterparts so we eventually got out the food colouring for more variety.  Warning: the turmeric is very potent and may stain your pot/utensils if you’re not careful.

DSC05883

There are lots of techniques for creating interesting patterns on your egg.  My favourite was placing strips of masking tape in a design on the egg before dunking it into the dye.  Rubber bands and hole reinforcement stickers are other alternatives.  The possibilities are endless!

DSC05879

DSC05877

Wishing you all a Happy Easter, Happy Passover, or Happy Long Weekend (for the atheists out there).

NaturalDyeRecipe

Make-ahead Breakfast Strata

28 Dec

Happy holidays!  It’s been a busy yet relaxing week filled with many Fs: family, friends, fun, and fabulous food.  I feel particularly thankful around this time of the year as I know there are many less fortunate than myself.  Despite living in different cities, my immediate family was able to connect again this year.  As we get older and life gets busier, work may not always allow us to travel to spend the holidays together.

Sand-sculpted nativity scene spotted on the beach on Christmas Day

Sand-sculpted nativity scene spotted on the beach on Christmas Day

Christmas morning is the perfect time for a wholesome, make-ahead breakfast to balance the feast that follows later in the day.  This year my mom suggested a strata and I had the perfect recipe in mind.  If you’re not familiar with the term, a strata is essentially just a savory bread pudding.  This strata uses whole grain bread, an equal ratio of egg to egg whites, and is brimming with veggies.  Outside of the holidays, this recipe is perfect for cottage weekends– a bit of quick prep the night before and the dish is ready to go into the oven the following morning. No fuss, no dishes to wash.

I wasn't able to sneak a photo before we dug in-- everyone was too hungry!

I wasn’t able to sneak a photo before we dug in– everyone was too hungry!

I recently bought myself a new camera (Merry Christmas to me!) so you’ll have to bear with me and my many photos as I learn to navigate its settings.  Stay tuned for a few more recipes over the next week or two.  It’s been a treat having the time to cook proper meals!

Layers of goodness

Layers of goodness

You may want to keep an eye on the strata at the 45 minute mark to prevent charring on top!

Keep an eye on the strata at the 45 minute mark to prevent charring on top!


Broccoli, Mushroom, and Cheese Breakfast Strata
(adapted from Foodnetwork.com)

4 tsp olive oil
1 large onion, diced (about 2 cups), and preferably a sweet onion, e.g. Vidalia
3 garlic cloves, minced
3 cups (8 oz) sliced mushrooms
5 cups cubed, whole grain bread
8 eggs and 8 egg whites
2 cups low-fat milk
1 tbsp Dijon mustard
1o oz frozen broccoli, thawed (or you can steam fresh broccoli, then cool)
1/3 cup (1 ounce) grated Parmesan cheese
1 cup (4 ounces) grated extra-old cheddar cheese
1/2 cup thinly sliced sundried tomatoes, reconstituted
2 tbsp minced fresh thyme leaves
1 tsp salt  (the original recipe calls for 1/2 tsp but some reviewers said it was too bland)
1/2 tsp freshly ground black pepper

  1. Heat 2 teaspoons of the oil in a nonstick skillet over medium heat. Add the onions and saute until translucent and beginning to brown, about 4 minutes. Add the garlic and continue to cook for another 1 minute. Transfer the onion mixture to a medium bowl and allow to cool.
  2. Heat remaining 2 teaspoons of oil in the skillet and saute the mushrooms until they release all of their water, about 7 minutes. Remove from heat and cool completely.
  3. Spray a large rectangular glass dish (9″x13″ or larger) with cooking spray. Arrange the bread cubes in the dish.
  4. To the onion mixture, add mushrooms, broccoli, and sundried tomato.  Pour over bread cubes, ensuring vegetables are evenly distributed.
  5. In a large bowl, beat the eggs, egg whites, milk and mustard until incorporated.  Add Parmesan and cheddar cheeses, thyme, and salt and pepper and stir to incorporate.
  6. Pour mixture over vegetables and bread, making sure liquid saturates bread.  Cover with plastic wrap and refrigerate overnight, or at least 8 hours.
  7. The next day: Preheat the oven to 350 degrees Fahrenheit. Remove the plastic wrap from strata and bake for 60 minutes, or until top forms a light brown crust and no liquid remains when knife is inserted into centre. You may want to place a baking sheet under the dish to prevent any spillage. An extra 15-20 minutes may need to be added to the baking time depending on the size/depth of your dish – cover dish with foil during this period to prevent the top from burning.

Makes 9 servings. Per serving: 297 kcal, 22 g CHO, 4 g fibre, 15 g fat (5.1 g saturated), 21 g protein, 710 mg sodium.

Mission Accomplished: the “Gala”-ctic Apple Frittata

1 Oct

It’s been a very exciting couple of weeks for me with adventures that have all shockingly(!) revolved around food.

The first exciting outing was a trip to the Ontario Food Terminal.  Last Saturday, for the first time in history, the terminal opened its doors to the public.  I’ve always dreamed of setting foot inside the terminal, curious to see the inner workings of the place that houses all of the produce that eventually makes its way onto our grocery store shelves.  The day did not disappoint: there were tours, cooking demonstrations, ample opportunities to chat with vendors, and free food.  I was on cloud nine!

My second thrill was being served dinner by Lynn Crawford (of Food Network fame).  When I booked E’s birthday dinner at her restaurant, I secretly hoped we would catch a glimpse of her but never expected that she would be waiting on us: filling our glasses with water and delivering our main course and dessert.  She described the food with the same enthusiasm that she does on TV.  It was totally surreal.

Finally, for the past two weeks I’ve been partaking in weekly ‘Food Missions for Food Lovers’ organized by the National Post newspaper.  I’ve been published in the paper both weeks, and I even got my own ‘Gastrosketch’ last week (sadly, cartoon Lisa appears to have a mustache).

Mission #17: Your Favourite Food

Mission #18: Taste Something New

This week’s challenge is to eat something with apples.  Challenge?!  Ha.  Apples just happen to be one of my favourite foods and they’ve made it into several recipes that I’ve posted on my blog since its inception.  Wanting to do something a little bit different, I decided on a frittata recipe that combines vegetables (potatoes, carrots, celery, and jicama… again!) and fruit (apples).  The result is a very hearty, satisfying dish with a delicate balance of savory and sweet.  It was a bit of a pain to prepare so I’ve included some tips that may (or may not) make the process less aggravating.

Don’t be alarmed, the purple flecks are from an heirloom carrot


Stovetop Potato & Apple Frittata
(from Clean Eating magazine, January 2011)

3/4 lb Idaho or Yukon Gold potatoes, peeled
3 tsp olive oil, divided
4 eggs
4 egg whites
2 medium carrots, peeled and grated
2 stalks celery, minced, leaves reserved and minced
1/2 tsp sea salt
1/2 c peeled and grated jicama, placed into a bowl of cold water to prevent it from browning
1 large firm Gala or Fuji apple, unpeeled
1/2 Spanish onion, sliced into thin rounds


  1. Thinly slice potatoes by cutting them in half, placing them flat side down on a cutting board, and then using a very sharp knife to make thin, even slices. As you finish cutting the potato halves, push the slices back together to prevent them from browning.
  2. Heat 1 tsp oil in a 10 or 12 inch thick bottomed nonstick pan over medium high heat for 1 minute. Add potatoes in a thin layer, so each slice is touching pan’s surface. Cook potatoes undisturbed for 5 minutes, then flip each slice over and cook for another 4 minutes. (The edges will brown and the centers will be nearly translucent when done). Work in batches, if necessary, placing each round of cooked potatoes on a cool plate and setting them aside. [Lisa’s aside: it would have taken me 5+ batches to get all of the potatoes cooked using this method.  I ended up microwaving the sliced potatoes in a dish with a bit of water (in 2 batches), then I quickly browned the potatoes in the pan to remove some of the moisture]
  3. Meanwhile, crack eggs and egg whites into a large bowl and break up yolks with a fork. Stir in carrots, celery stalk, and salt. Squeeze water out of jicama and stir jicama into egg mixture.
  4. While last batch of potatoes is cooking, thinly slice apple. Transfer final batch of potatoes onto a cool plate and set aside. Then add 1 tsp oil, apple, and onion to same pan used to cook potatoes. Reduce heat to medium and cook for 5 minutes, stirring occasionally, until apple and onion slices are nearly translucent.
  5. Add potatoes to egg mixture then stir in apple and onion. Add remaining 1 tsp oil to same pan, pour in egg mixture and cover. Cook over medium heat for 15 minutes or until edges brown and begin to pull away from pan. As you’re cooking frittata, slip a heat proof spatula around its sides once or twice and jiggle pan to make sure frittata isn’t sticking. Invert frittata by removing the pan from the heat, placing a large plate over the pan, and flipping frittata onto the plate. Slide frittata back into pan, uncooked side down, and cook, uncovered, for 5 more minutes. Slide frittata back into pan and onto serving plate. Garnish with reserved celery leaves.  [The frittata was way too massive and heavy to flip… plus, I’m not that skilled!  Instead, I cooked the frittata with a lid to help steam the top]
Makes 4 servings.  Per serving: 246 kcal, 8 g fat (2 g saturated), 30 g CHO, 5 g fibre, 13 g protein, 422 mg sodium.