Baking seems like the natural thing to do on a Sunday morning when you’re up by 7:00 am (thank you, Cora) with little to no plans for the day. There was also some pressure from the black banana sitting on my counter, staring at me longingly for the past week. I was determined to use it before it needed to be thrown in the freezer, where it would sit with the rest of the sad overripe bananas that have been there for over a year.
I thought about making my go-to banana bread recipe, but muffins take much less time to bake and I’m always looking for new recipes to try. A quick search using my very advanced approach of adding the term “healthy” to the food item led me to a recipe from the blog Cookie and Kate, where I’ve found delicious recipes in the past. It had a 5 star rating from 175 reviewers so I knew it was a safe bet.

It’s a one bowl recipe that requires little to no effort, other than mashing the bananas. The resulting muffin was moist, with nice texture from the added oats. I find that bananas add so much natural sweetness to baked goods that you can easily reduce the sugar, even in recipes that already call for very little.
My goal is to blog a little bit more often in the coming weeks since March is Nutrition Month (but hey, no promises). I’m always looking for inspiration so please let me know if you have any favourite recipes that you are willing to share!
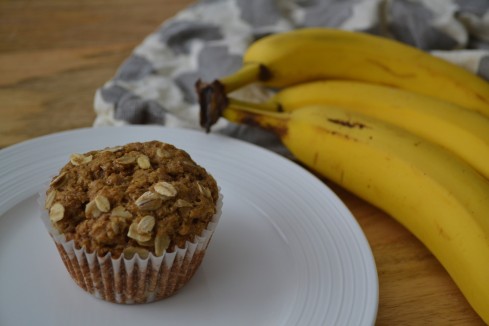
Whole Grain Banana Muffins
(adapted very slightly from CookieandKate.com)
1/3 cup melted coconut oil or extra-virgin olive oil
1/3 cup maple syrup (or honey)
2 eggs, preferably at room temperature
1 cup packed mashed ripe bananas (about 3 bananas)
¼ cup milk
1 teaspoon baking soda
1 teaspoon vanilla extract
½ teaspoon salt
½ teaspoon cinnamon
1-3/4 cups whole wheat flour
1/3 cup large flake oats, plus more (~1 tbsp) for sprinkling on top
1 teaspoon brown sugar, for sprinkling on top
- Preheat oven to 325 degrees Fahrenheit. If necessary, grease 11 cups of your muffin tin with butter or non-stick cooking spray, or use paper liners.
- In a large bowl, beat the coconut oil and maple syrup together with a whisk. Add eggs and beat well. Mix in the mashed bananas and milk, followed by the baking soda, vanilla extract, salt and cinnamon.
- Add the flour and oats to the bowl and mix with a large spoon, just until combined. If you’d like to add any additional mix-ins (like nuts, chocolate or dried fruit) fold them in now.
- Divide the batter evenly between the 11 muffin cups, filling each cup about two-thirds full. Sprinkle the tops of the muffins with a small amount of oats (about 1 tablespoon in total), followed by a light sprinkling of sugar (about 1 teaspoon in total). Bake muffins for 23 to 25 minutes, or until a toothpick inserted into a muffin comes out clean.
- Place the muffin tin on a cooling rack to cool. You might need to run a butter knife along the outer edge of the muffins to loosen them from the pan. Enjoy muffins as is or with a spread of nut butter or regular butter.
Makes 11 muffins. Per muffin: 218 kcal, 8.2 g fat (6 g saturated – if using coconut oil), 32 g carbohydrate, 4 g fibre, 5 g protein, 230 mg sodium